The correct use of animations can mean the difference between your iOS app being just another one of many on the store, or standing out from the crowd.
In this post, we will look at the use of CALayers to quickly create fun animations to give your mobile app that extra little bit of polish. We’ll work through the process of creating a simple animation, looking at some of the issues you could encounter and what to do to avoid them.
Scenario
You are to develop a mobile application in which you will show progress to the user. The design team feel that simply displaying a number is too boring, a dynamically created static graphic is too plain, and that a UIProgressView isn’t quite what they are looking for. A custom animating view is required to best suit the feel of the app and you know that CALayers are the tool for the job.
Part 1
In order to easily utilise your new CALayer (such as in interface builder), it is easiest to wrap the layer within a UIView. Start by creating two new classes: LinearProgressView which which subclasses UIView and LinearProgressLayer which subclasses CALayer. We would like to display progress from 0 to 100 so in the header file of each class, declare a property of type NSUInteger called progress:
LinearProgressView.h
@interface LinearProgressView : UIView

@property (nonatomic) NSUInteger progress;

@end
LinearProgressLayer.h
@interface LinearProgressLayer : CALayer

@property (nonatomic) NSUInteger progress;

@end
In LinearProgressLayer.m, all that is required is to declare that its layer is a LinearProgressLayer, and to pass the on the progress to its layer (with some validation):
LinearProgressView.m
@implementation LinearProgressView

+ (Class)layerClass
{
  return [LinearProgressLayer class];
}

- (void)setProgress:(NSUInteger)progress
{
  if (progress > 100)
  {
    progress = 100;
  }
  ((LinearProgressLayer *) self.layer).progress = progress;
}

- (NSUInteger)progress
{
  return ((LinearProgressLayer *) self.layer).progress;
}

@end
Now for the fun stuff! In LinearProgressLayer.m, there are three main methods which need to be overridden for the animation to happen:
- needsDisplayForKey: so that the layer knows that there should be an animation
- actionForKey: so that the layer knows which animation to use
- drawInContext: so that the layer knows what it should draw throughout the animation
LinearProgressLayer.m
@implementation LinearProgressLayer

+ (BOOL)needsDisplayForKey:(NSString *)key
{
  if ([key isEqualToString:@"progress"])
  {
    return YES;
  }
  return [super needsDisplayForKey:key];
}

- (id<CAAction>)actionForKey:(NSString *)event
{
  if ([event isEqualToString:@"progress"])
  {
    CABasicAnimation *animation = [CABasicAnimation animationWithKeyPath:event];
    animation.fromValue = [[self presentationLayer] valueForKey:event];
    animation.timingFunction = [CAMediaTimingFunction functionWithName:kCAMediaTimingFunctionEaseInEaseOut];
    animation.duration = 1.f;
    return animation;
  }
  return [super actionForKey:event];
}

- (void)drawInContext:(CGContextRef)context
{
  [super drawInContext:context];

  // Draw the track bar
  CGPathRef path1 = [self pathForProgress:100];
  CGContextAddPath(context, path1);
  CGPathRelease(path1);
  CGContextSetFillColorWithColor(context, [UIColor lightGrayColor].CGColor);
  CGContextDrawPath(context, kCGPathFill);

  // Draw the progress bar
  CGPathRef path2 = [self pathForProgress:self.progress];
  CGContextAddPath(context, path2);
  CGPathRelease(path2);
  CGContextSetFillColorWithColor(context, [UIColor blueColor].CGColor);
  CGContextDrawPath(context, kCGPathFill);
}

- (CGMutablePathRef)pathForProgress:(NSUInteger)progress
{
  CGFloat height = self.frame.size.height;
  CGFloat radius = height / 2.f;
  CGFloat xMin = radius;
  CGFloat xMax = self.frame.size.width - radius;
  CGFloat x = xMin + (progress / 100.f) * (xMax - xMin);

  CGMutablePathRef path = CGPathCreateMutable();
  CGPathMoveToPoint(path, NULL, xMin, radius * 2.f);
  CGPathAddArc(path, NULL, xMin, radius, radius, M_PI / 2.f, 3.f * M_PI / 2.f, NO);
  CGPathAddLineToPoint(path, NULL, x, 0.f);
  CGPathAddArc(path, NULL, x, radius, radius, 3.f * M_PI / 2.f, M_PI / 2.f, NO);
  return path;
}

@end
For now we have hard-coded some values for the animation timing function and duration as well as the colours used. Now add a LinearProgressView to the storyboard, hit run and see...nothing…?
Let’s get debugging! If you add a breakpoint within the drawInContext: method then you will see that it is never called. This can be fixed by adding the following in LinearProgressLayer.m to force the layer to draw:
- (id)init
{
  self = [super init];
  if (self)
  {
    [self setNeedsDisplay];
  }
  return self;
}
Run the iOS app again and you will now see that drawInContext: is called and the view is displayed. It is also possible to see your hard work in the storyboard without having to run the application at all by marking LinearProgressView as IB_DESIGNABLE:
LinearProgressView.h
IB_DESIGNABLE
@interface LinearProgressView : UIView

@property (nonatomic) NSUInteger progress;

@end
Link up your LinearProgressView in the storyboard with an IBOutlet and set the progress somewhere in your code. Run the mobile app and see...the progress doesn’t change…?
Add a breakpoint in actionForKey: and you’ll see that the CABasicAnimation object driving the animation is not created. This is resolved by marking the progress property as @dynamic in LinearProgressLayer.m:
@implementation LinearProgressLayer1

@dynamic progress;

...

@end
Run the app again and it works! Beaming with pride, you rush over to show the design team your hard work but they immediately spot two glaring issues:
- The animation is jerky
- The outlines are fuzzy

Looks like more work is required…
Part 2
Your CABasicAnimation object handles determining how the progress changes over time but why doesn’t it do so smoothly? The answer lies in the type of our progress property: by defining progress as an NSUInteger, the progress can only take discrete values rather than vary over a smooth continuum. Go through the LinearProgressView and LinearProgressLayer classes and replace NSUInteger with CGFloat. In addition, it might be a good idea for the LinearProgressView to now also validate the the progress is positive.
After a bit of research, you find that setting the layer’s contentsScale property to the screen scale should solve your problem. You try updating the LinearProgressLayer init method:
- (id)init
{
  self = [super init];
  if (self)
  {
    self.contentsScale = [UIScreen mainScreen].scale;
    [self setNeedsDisplay];
  }
  return self;
}
But find that it hasn’t worked! You attempt to debug the issue by logging the value of contentsScale within the drawInContext: and find that it seems to have been reset to the default value of 1.
We'll now take a short detour in debugging this issue properly but feel free to skip and continue with Part 2.
A Detour In Debugging
As suggested by this stack overflow answer, it appears that by overriding the view’s layerClass method, the layer’s contentsScale may be reset. Rather than simply take their word for it, we can investigate further and so to start with, we add some breakpoints to try to establish the lifecycle of the view and layer:
LinearProgressView.m
- (id)initWithCoder:(NSCoder *)aDecoder
{
  self = [super initWithCoder:aDecoder]; // 1st
  return self; // 5th
}

+ (Class)layerClass
{
  return [LinearProgressLayer2 class]; // 2nd
}
LinearProgressLayer.m
- (id)init
{
  self = [super init]; // 3rd
  if (self)
  {
    self.contentsScale = [UIScreen mainScreen].scale;
    [self setNeedsDisplay]; // 4th
  }
  return self;
}
Which appear to occur in a logical order. Next we print the layer to the console at breakpoints 4 and 5 respectively and see:
<LinearProgressLayer:0x60000002c920; position = CGPoint (0 0); bounds = CGRect (0 0; 0 0); allowsGroupOpacity = YES; contentsScale = 2>

<LinearProgressLayer:0x60000002c920; position = CGPoint (187.5 132); bounds = CGRect (0 0; 343 32); delegate = <LinearProgressView: 0x7f845c70d8e0; frame = (16 116; 343 32); autoresize = RM+BM; layer = <LinearProgressLayer: 0x60000002c920>>; allowsGroupOpacity = YES; backgroundColor = <CGColor 0x608000286270> [<CGColorSpace 0x60000002e240> (kCGColorSpaceICCBased; kCGColorSpaceModelMonochrome; Generic Gray Gamma 2.2 Profile; extended range)] ( 1 1 ); contentsScale = 1>
Clearly a lot has happened to the LinearProgressLayer between the 4th and 5th breakpoint!
Seeing that the LinearProgressView is the delegate of the LinearProgressLayer, we explore CALayerDelegate where the actionForLayer:forKey: method appears promising. Implementing this optional delegate method and logging the event key (returning nil as specified in the documentation if the delegate doesn't specify a behaviour for the event), we see a number of event keys including 'contentsScale'. Furthermore, the documentation leads us to look into the CALayer class method defaultActionForKey: and subsequently back to the CALayer instance method actionForKey: as used earlier.
According to the documentation, the default (super) implementation of actionForKey: calls a number of methods in order including the CALayerDelegate method actionForLayer:forKey: and CALayer class method defaultActionForKey: searching for a non-nil object implementing the CAAction protocol. Logging the default action, event key and the layer's contentsScale in this method, we see that the action object is always nil and, most importantly, the contentsScale is [UIScreen mainScreen].scale until after actionForLayer:forKey: has been called with event key equal to 'contentsScale', after which time it is reset to the default value of 1.
Having now determined why and how the contentsScale has been reset, the 'proper' way to resolve the issue would be to override one of actionForLayer:forKey:, defaultActionForKey: or actionForKey: and return an object implementing the CAAction protocol which would set the layer contentsScale in its protocol method. However, for this action object to be utilised, it appears that the layer's contentsScale must be set at least once (as we are currently doing in the layer init method). However, the much easier approach is simply to set the layer's contentsScale after all this initial default behaviour is finished...
Part 2 Continued
You try a new approach, first reverting the LinearProgressLayer init method change and instead setting the layer’s contentsScale from LinearProgressView:
LinearProgressView.m
- (id)initWithCoder:(NSCoder *)aDecoder
{
  self = [super initWithCoder:aDecoder];
  if (self)
  {
    self.layer.contentsScale = [UIScreen mainScreen].scale;
  }
  return self;
}
It worked! The design team are impressed and so is your boss who asks you to make this into a common component which can be easily customised for use in future projects. It looks like your work isn’t over just yet…
Part 3
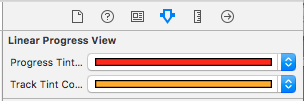
You decide that your first priority to make your new UI component reusable is to make the colours easily customisable. Taking inspiration from UIProgressView, you decide to adopt their naming convention with properties called progressTintColor and trackTintColor. In addition, you mark these properties in LinearProgressView.h as IBInspectable so that they can be set directly from the storyboard:
IB_DESIGNABLE
@interface LinearProgressView : UIView

@property (nonatomic) CGFloat progress;

@property (nonatomic) IBInspectable UIColor *progressTintColor;

@property (nonatomic) IBInspectable UIColor *trackTintColor;

@end
Duplicate these properties in LinearProgressLayer and, as we did for progress, have LinearProgressView forward these values onto its layer.
Now replace the hard-coded colours in the LinearProgressLayer drawInContext: method with these newly declared properties. We also need to declare some default values so add these to the LinearProgressLayer init method:
@implementation LinearProgressLayer

...

- (id)init
{
  self = [super init];
  if (self)
  {
    self.trackTintColor = [UIColor lightGrayColor];
    self.progressTintColor = [UIColor blueColor];
    [self setNeedsDisplay];
  }
  return self;
}

...

- (void)drawInContext:(CGContextRef)context
{
  [super drawInContext:context];

  // Draw the track bar
  CGPathRef path1 = [self pathForProgress:100.f];
  CGContextAddPath(context, path1);
  CGPathRelease(path1);
  CGContextSetFillColorWithColor(context, self.trackTintColor.CGColor);
  CGContextDrawPath(context, kCGPathFill);

  // Draw the progress bar
  CGPathRef path2 = [self pathForProgress:self.progress];
  CGContextAddPath(context, path2);
  CGPathRelease(path2);
  CGContextSetFillColorWithColor(context, self.progressTintColor.CGColor);
  CGContextDrawPath(context, kCGPathFill);
}

...

@end
Set some fancy new colours from the storyboard, run the project and see that the new colours have taken effect:
Then perform the animation and see...the colours turn to black…? Over the course of animation, it appears that the reference to the colours is lost as trackTintColor and progressTintColor are nil during drawInContext:. Checking the documentation of CALayer, you notice that there is another initializer which you have not overridden and you realise that you need to add the following to LinearProgressLayer.m:
- (id)initWithLayer:(id)layer
{
  self = [super initWithLayer:layer];
  if (self)
  {
    if ([layer isKindOfClass:[LinearProgressLayer3 class]])
    {
        LinearProgressLayer3 *other = (LinearProgressLayer3 *)layer;
        self.trackTintColor = other.trackTintColor;
        self.progressTintColor = other.progressTintColor;
    }
  }
  return self;
}
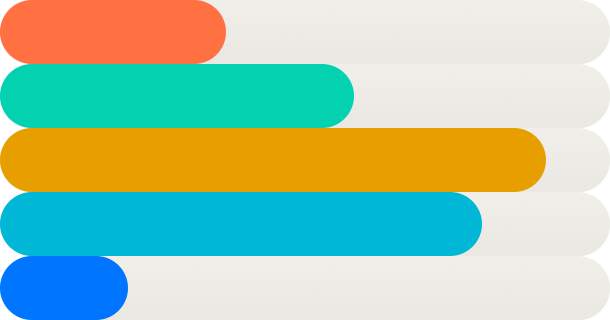
Run the project again and it looks pretty awesome even if you do say so yourself!

From here, there are further customisations, modifications and improvements which could be implemented including:
- Customisable CAMediaTimingFunction
- Customisable animation duration
- Animation duration dependant on the difference between the ‘from’ and ‘to’ values
- Progress to run from 0 to 1 for a further parallel to UIProgressView
- DOCUMENTATION!
But these are left as an exercise to the reader.
Conclusion
Animations utilising CALayers are a great addition to almost any app but as seen here, there are many places you can get stuck and start tearing your hair out trying to figure out why it refuses to behave. See the example project here for the completed code at the end of each round and get started on your next great animation.