So, you have thoughtfully crafted an API specification for your app to talk to a backend and now just require a robust and quick way to make the API come alive.
Recently, I happened to be in the exact same position.
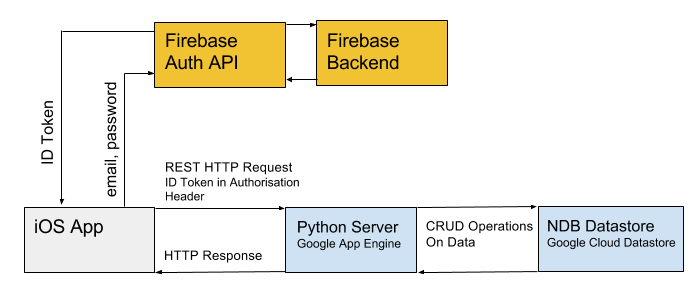
An iOS app required a backend that could register and authenticate users as well as allow users to create, store, read, update and delete some data. After thoughtfully writing down the REST API specification (using RAML as the modeling language) and pondering about the backend design decisions, I ended up with the following configuration of components as the configuration of my choice.

Before the above diagram makes sense, we need to know what Google App Engine, Firebase and Cloud Datastore are.
Google App Engine (GAE) is a cloud computing platform for developing and hosting apps. You can use GAE to host and run a backend for your app. The GAE standard environment executes your backend code and allows it to receive web requests from your app.
Firebase is a platform with tools and infrastructure to build apps e.g. Firebase Authentication “provides backend services, easy-to-use SDKs, and ready-made UI libraries to authenticate users to your app”.
Google Cloud Datastore is a NoSQL database holding data objects. Data objects are stored as entities where an entity can have one or more properties. The Google Datastore NDB Client Library allows Python apps running on the Google App Engine (or locally if using the local development server) to connect to Cloud Datastore.
Now, looking at the above diagram, we can see that the above application has the following components:
- The iOS app provides a user interface which allows a user to register a user account using their email/password credentials.
- This creates a new user account with the above credentials on the Firebase backend.
- Next, when the user with the above credentials logs into the iOS app, it sends the above credentials to the Firebase backend. The firebase backend returns an authentication ID token if the credentials are authorised.
- The iOS app sends this ID token in an authorisation header along with any REST HTTP Request (think GET, POST, PUT, PATCH, DELETE) to the GAE backend.
- The GAE backend verifies the ID token present in the authorisation header and performs the HTTP request and returns a response to the iOS app.
- Once the GAE backend verifies the above ID token, it can create, read, update or delete (perform CRUD operations) on the requested data object stored on the cloud datastore.
Thus, using Firebase Authorisation allows you to completely delegate the authorisation functionality (think sending confirmation emails, using multiple authorisation providers for the same user e..g Facebook, Twitter ) away from your backend. Using Google App Engine allows you to completely delegate your backend availability and scalability (think maintaining servers) to Google. Of course, scalability with simplicity comes with a price as you will most likely need a paid account for your app as it starts to become more popular.
In part 2 of this tutorial, I will explain how to set up the tools and SDKs to implement the above configuration for your application.
